
Port forwarding
1. Set up account
The first step in creating a manual port is, of course, to set up your account with Synology. For this, go to 'settings' on your computer. Then click on 'external connections' under the 'connections' header. In the screen that now appears, you will see a tab in the upper right corner labeled 'DDNS'. This stands for Dynamic Domain Name System and allows you to link your server's IP addresses to a domain name on the internet.
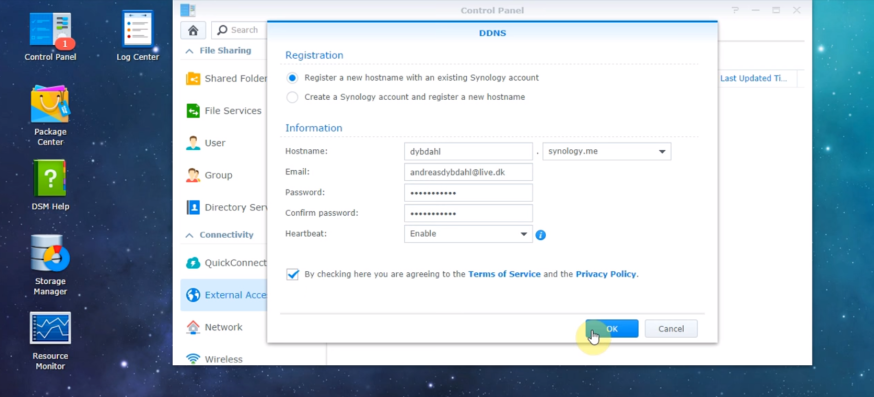
In the DDNS screen, you will see the option to choose a service provider at the top. Choose Synology and click on 'register'. You will now have the option to log in with an existing account or register a new one. Below that are all the fields where you can fill in your account details (see screenshot). Finally, you must accept the terms and can set up your Synology account on your computer.
When you set up DDNS, you link your NAS to a fixed name on the internet. This way, you don’t have to remember a complicated IP address, and your server remains accessible – even if your provider changes your IP address.
In the DDNS screen, you then choose a clear hostname, such as "yourname.synology.me". Save your settings and check if the status is "Normal" or "OK".
Tip: then add a Let's Encrypt certificate under Security → Certificate. This way, you can log in securely without browser warnings.
2. Finding the right ports
Now that you have set up your account, it’s time to find the right ports. This depends on what exactly you want to do with your external server. Depending on the program or site you want to reach, you will need a different port, sometimes with a different extension. Fortunately, Synology has published a complete overview, where you can find almost all the information you need.
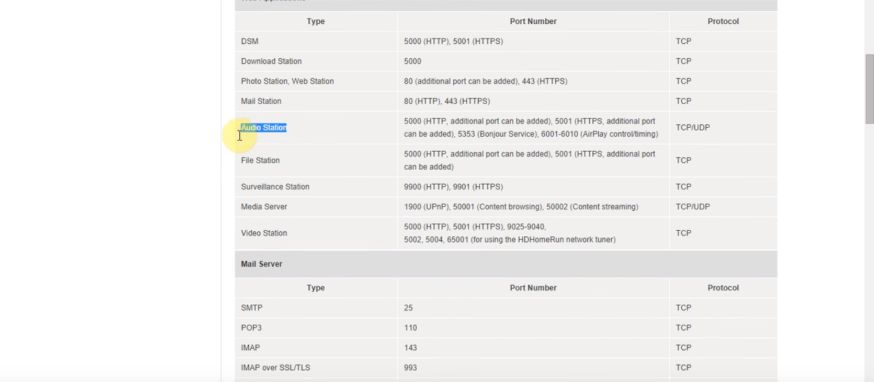
To ensure that the connection from outside works well, it’s useful to write down these ports before proceeding with the router settings. This keeps it organized.
A few commonly used ports for port forwarding are:
- DSM management: external 443 → internal 5001 (HTTPS)
- Web Station: external 443 → internal 443
- Synology Drive: external 6690 → internal 6690
Note down for each service which external port, internal port, and which protocol (usually TCP) you are using. This prevents errors when setting up in the next step.
3. Setting up the ports
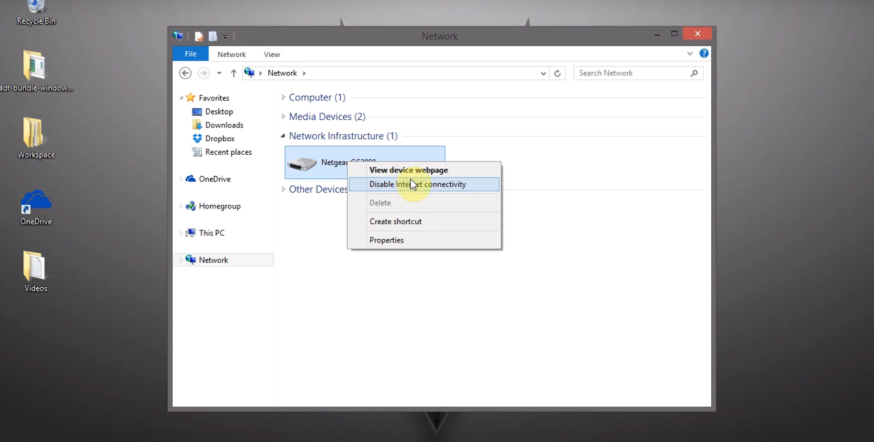
Now that you know which port you need, along with the extension, the real work can begin. First, go to your file explorer, navigate to 'network', and right-click on your router. At the top, there is an option to go to the router's webpage. Click on it.
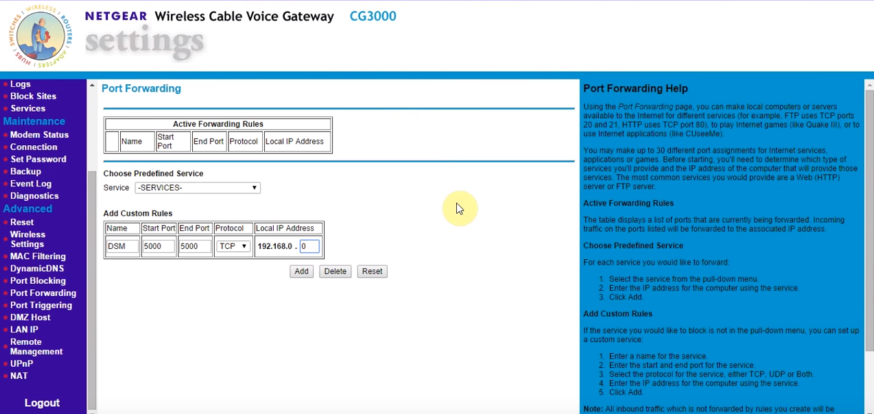
Then look for the option 'Port Forwarding' on this page. This may be easier to find on some routers than others. As you can see in the screenshot, you can fill in the details you looked up earlier. In this example, you can see how to set up a DSM port.
Extra tip: If "Port Forwarding" is not literally in your router menu? Sometimes it is also called 'NAT', 'Port Mapping', or 'Virtual Server' – it’s exactly the same.
Always enter the fixed IP address of your NAS (e.g., 192.168.1.50) under 'Target device', so that the traffic is directed to the correct device.
Save your settings and check if the rule is active.
Example rule:
DSM-HTTPS → external port 443 → internal port 5001 (TCP).
4. Connect via your browser
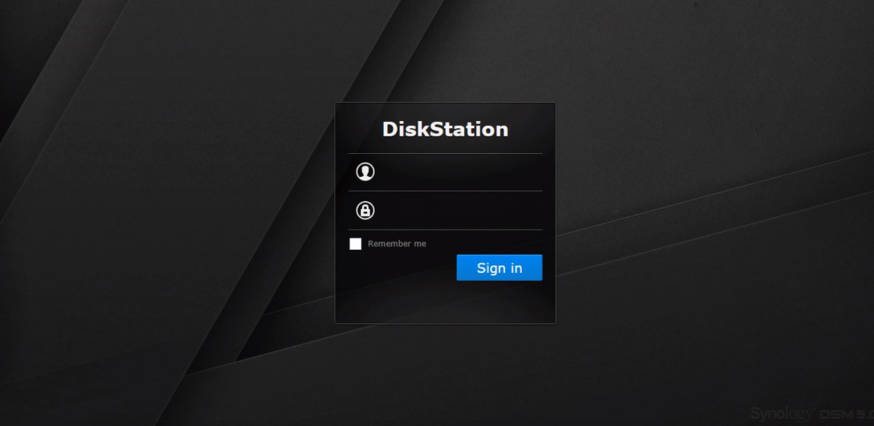
Now that the port is set, it’s time to see if it really works. For this, go to your browser and type in your hostname. You used this earlier when registering in step 1. You will then arrive at the login screen of Synology, which allows you to access your server via the ports you set up.
Test this preferably via 4G or 5G – so outside your own Wi-Fi network. This way, you can be sure that the connection really works from outside.
Don’t see a login screen? Then check:
- If the port is correctly filled in with the right IP address.
- If HTTPS (port 5001) is enabled on your NAS.
- If your internet provider is blocking incoming traffic (CGNAT).
In doubt? Ask your provider for help or check the Synology forum – you will quickly find similar examples there.
Mini-checklist to see if everything is correct
- ✔ NAS has a fixed IP address (DHCP reservation)
- ✔ DDNS active and status OK
- ✔ Forward rule: external port → NAS-IP → internal port
- ✔ HTTPS active (port 5001)
- ✔ Connection tested via mobile network