
Why an underwater camera changes your photography
Underwater photography is not just a fun gimmick, but a completely different way of seeing. Because you are no longer bound by gravity, you can take positions that are impossible on land. You add something unique to your portfolio:
Floating compositions: subjects and models in an almost extraterrestrial setting without a fixed horizon.
Light play: sun rays ('god rays') that become visible through floating particles in the water.
Unique macro: animals, textures, and patterns of corals that only exist below the water's surface.
The beauty is that where you used to need expensive dive housings and hardcore dive training, underwater photography is now much more accessible. There are robust compacts that can go straight into the water, action cameras that easily reach snorkeling depths, and serious housings that allow you to take your system camera into the depths.
If you want to dive deeper right after this basics with extra tips, techniques, and equipment, check out Underwater photography: tips, techniques, and equipment.
The goal of this guide is to give you enough knowledge to consciously choose a set, understand what happens to your light, and confidently make your first (or next) dive with a camera.
Gear check: which underwater camera is right for you?
Not every underwater camera is made for the same purpose. Your choice not only determines the image quality but also how deep you can go, what you can operate with gloves on, and how much maintenance you have.
1. Robust compacts: the all-in-one dive friend
This is often the entry point for serious photography. Think of cameras like the OM System Tough series (formerly Olympus) or the Nikon Coolpix W series. These cameras are built like tanks: they are waterproof out of the box, shock-resistant, and can withstand freezing temperatures. The big advantage is the simplicity; you don't have to open a housing to change your SD card, and you don't have to worry about leaks while snorkeling.
Pros
No need for a separate underwater housing for snorkeling and shallow diving.
Often excellent macro mode – ideal for details, shells, anemones.
Handy size; fits in your BCD or life jacket pocket.
Cons
Limited sensor size, so less dynamic range than a system camera.
Limited physical buttons: operating with thick gloves can be fiddly.
Perfect for: snorkelers, recreational divers, and photographers who mainly want to work close to subjects without carrying extra gear. In Diving deeper: underwater photography, you can read how to photograph underwater in a controlled and conscious manner with a compact set.
2. Action cameras: small, light, and video-oriented
GoPro, Insta360, and the DJI Osmo Action are the logical choice if video is more important to you than photos. These cameras are designed to be "set and forget." They have a fixed focus and a huge depth of field, making almost everything sharp. They are small enough to mount anywhere but offer less photographic control.
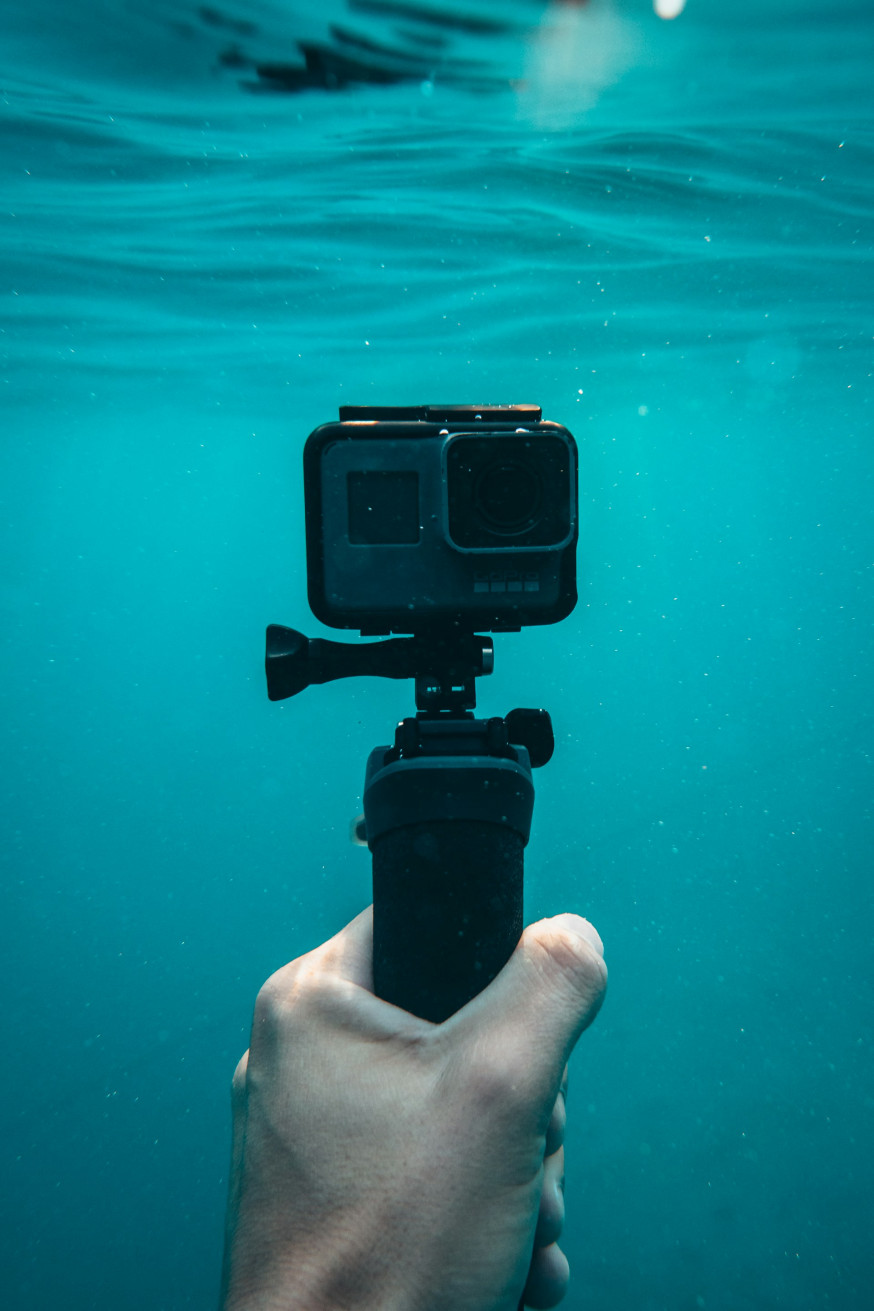
Action cameras are unmatched in ease of use and size, ideal for quick shots just below the surface.
Strong in
Wide angle – you capture a lot of environment and movement in the frame.
Image stabilization, ideal for snorkeling, surfing, or freediving.
Compact and light: can be mounted on your mask, chest, or stick.
But be careful
Small sensor and strong wide-angle perspective make close-ups difficult.
For serious color correction underwater, you need filters or post-processing.
Perfect for: dynamic video, travel reports, sports like surfing or snorkeling where your hands are not always free.
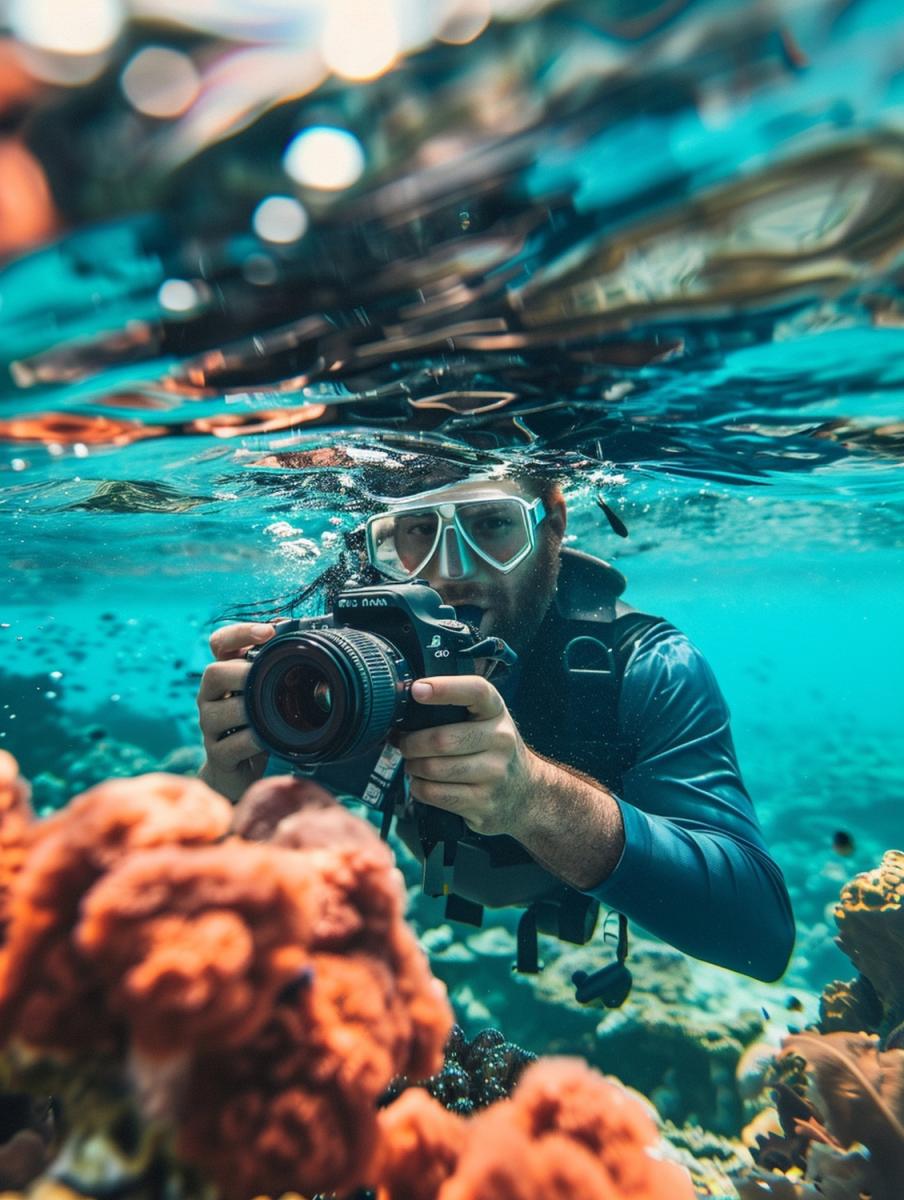
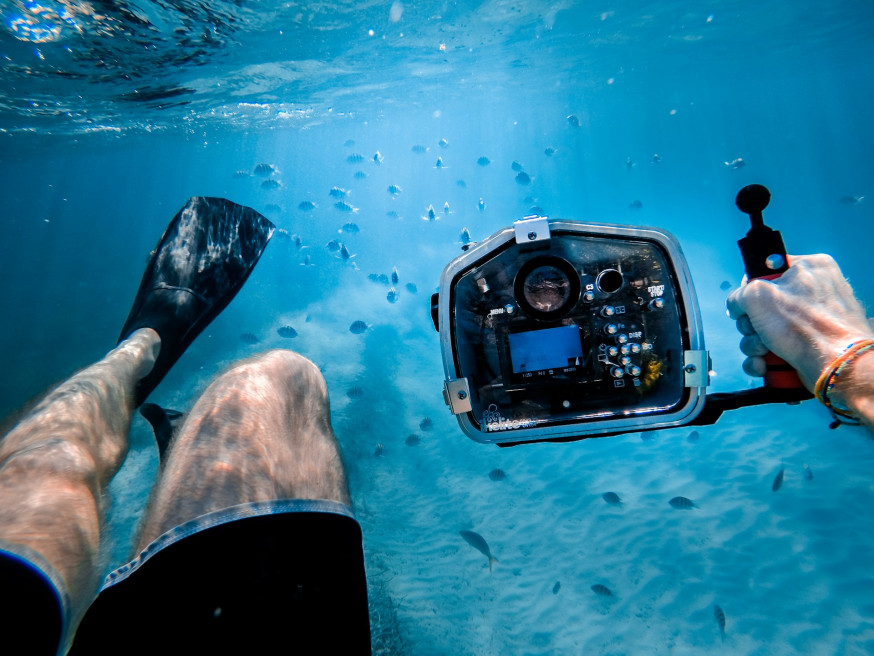
3. System camera in housing: the high-end underwater camera
If you want maximum control over sharpness, depth of field, and dynamic range, there is no substitute for your own system camera or DSLR in a special underwater housing. This is the route for the perfectionist. You place your trusted body in a custom-made aluminum or polycarbonate housing. This allows you to use your top lenses, but it does make your set large, heavy, and costly.
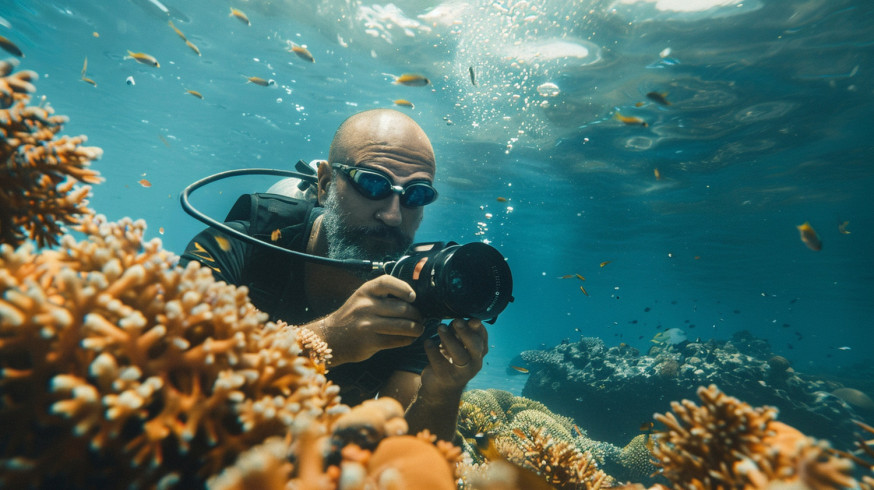
For full control over aperture and exposure, the system camera goes into a special housing. An investment in both money and technique.
Advantages
Large sensor, high image quality, raw files for extensive post-processing.
Choice of specialized lenses: fisheye for grand reefs, macro for tiny creatures.
Expandable with flashes, focus lights, domes, and ports.
But…
Expensive and heavy: housing, ports, and arms can quickly cost more than the body itself.
You need to know every button and O-ring well – a mistake means water damage.
More buoyancy, more resistance in the water; requires some diving skills.
Perfect for: experienced photographers and divers who see underwater photography as a main component of their work or passion.
What water does to light: the physics of color, distance, and reflection
As soon as you put your head under, light changes to a different language. Water has a much higher density than air, and that has drastic consequences for what your camera's sensor sees. If you understand these three optical basic rules, you will see why your settings from dry land do not work with your underwater camera.
Color absorption: why everything turns blue
It is the biggest shock for beginners: water absorbs colors. The water acts as a huge cyan filter that blocks warm tones from the spectrum. This does not happen all at once, but gradually as the light path through the water becomes longer. The result is that a beautiful red coral at 10 meters depth suddenly looks dull brown or gray in your photo because that color information never reaches the sensor.
Red is the first color to disappear; often it is largely gone after 3 to 5 meters.
Orange and yellow hold on a bit longer but then disappear.
Blue and green remain the longest and dominate your image.
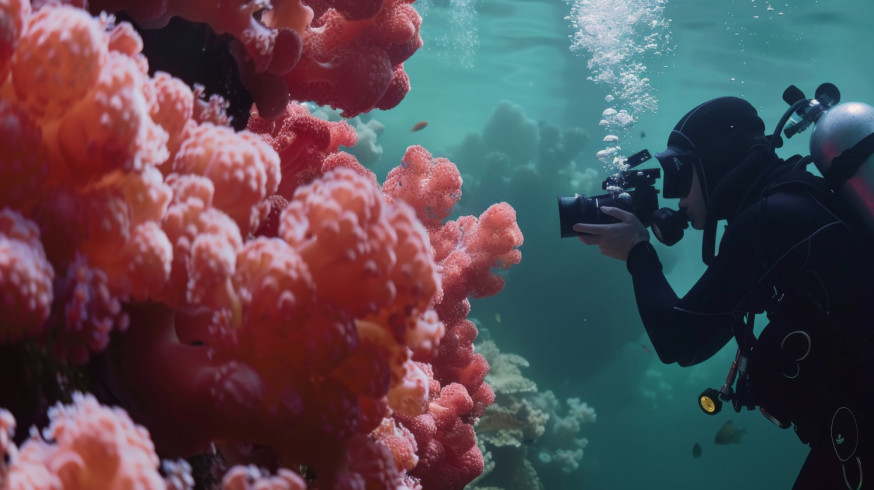
Physics in practice: without the artificial light from the flashes, this soft coral would look gray at this depth. Red is the first color that the water filters out.
Do you want to read more about the physics behind that order (wavelengths and absorption)? NOAA explains this clearly in Light and Color in the Deep Sea.
The consequence: a red coral at 10 meters depth suddenly becomes dull brown or gray in your jpg. You can hardly recover this in post-processing if the information is not there. The solutions are therefore physical in nature:
Get close: the less water there is between you and the subject, the less color loss.
Use filters: a red filter for your lens or dome (effective between 3–15 meters depth) cancels out the blue effect.
Artificial light: with flashes or powerful video lights, you bring back the full spectrum and the true color of the subject at close range.
Refraction: everything seems bigger and closer
In addition to color, water also distorts your perspective. Because water has a different refractive index than air, light rays bend as they pass through the glass of your diving mask or housing. This creates an optical illusion: objects appear underwater to be about 25 to 30% larger and a third closer than they actually are. This takes some getting used to for your composition and your focusing. You think you have a fish filling the frame, but in the photo, it is only half in.
The practical consequence: do not rely solely on your instinct. Look closely in your viewfinder or on your screen and check your edges, because your subject is faster against the edge than you think.
Anyone who wants to delve deeper into the optics and light penetration underwater will find a clear explanation in Light in the Ocean from the University of Hawaii.
Visibility and backscatter: dust in the spotlight
Water is never 100% clear; it is full of floating particles like sand, plankton, and algae. If you shine your flash or video light directly in front (like the built-in flash of your camera), all those particles reflect the light directly back into your lens. The result is backscatter: a photo that looks like a snowstorm in the headlights of a car.
Here’s how to limit that:
Do not place your flashes or lights directly next to your lens, but slightly to the side and angled outward.
Get closer to your subject and illuminate the subject, not the water mass in between.
The clearer the water, the fewer problems – but even in pool water, you can get backscatter if your light setup is unfavorable.
The goal: You want to illuminate the subject with the edge of the light beam ('edge lighting'), without lighting up the water column between your lens and the subject.
Mindset underwater: photographer, diver, and biologist
Mastering an underwater camera is more than just technique. You work in an environment where you are vulnerable and where everything is alive. You need to divide your attention between your camera settings, your remaining air, your buddy, and the fragile environment.
Multitasking in the deep: as an underwater photographer, you are primarily a diver. Mastery of your buoyancy is crucial for taking stable shots without hitting the reef.
Safety first: good diving or snorkeling skills are more important than gear. Stay within your certification, adhere to the buddy system, and do not go "for the photo" deeper or longer than is responsible.
Know animal behavior: many species are approachable if you remain calm, do not chase, and respect their escape route.
Respect the environment: do not touch coral for "stability", do not chase animals for an action shot, do not flash in the eyes of animals that cannot handle it.
See yourself as a guest: your underwater camera is a way to create stories, not to disturb the scenery.
In practice: how to get the best out of your underwater camera on every dive
You now know the gear and the physics – it's time to see how you translate that into concrete choices while photographing underwater.
The golden rule: as close as possible
We cannot say it often enough: distance is your biggest enemy. Water is a murky medium. The more water there is between you and your subject, the more your image quality deteriorates: contrast loses strength, colors fade, and floating debris becomes visible as distracting snow.
To counter this, you need to adjust your strategy:
Use wide-angle or fisheye: for large scenes (wrecks, reef walls), this is essential. It allows you to capture the entire subject while being physically very close.
Crawl right up for macro: with compacts and macro lenses, you may literally be just a few centimeters from the subject. The basics of focusing and distance in macro can be read in Macro photography: how it works.
Remember the mantra for underwater: "If you think you are close enough, swim a little closer" – as long as you do not touch the environment.
White balance, RAW, and color correction
Even with filters and flashes, color remains a challenge. Your camera's automatic white balance often gets confused by all the blue and tries to correct it, sometimes resulting in unnatural colors. A few guidelines:
Use custom white balance where possible: manually set underwater on a gray or white card (or a sandy bottom as a last resort).
Photograph in RAW: for system cameras and advanced compacts, RAW is essential. It gives you the flexibility to drastically adjust the white balance in post-processing and recover lost red and yellow tones.
For action cam and compact: experiment with the special 'Underwater' color profiles or shoot in a 'Flat' profile if you want to edit yourself later (color grading).
If you want to set that custom white balance consistently and repeatably, Setting white balance manually with a gray card shows step by step how to use such a reference shot, both in-camera and during development.
Since color underwater is rarely 'right' in one go, it pays to know how to tighten your white balance in post-processing – for example with Correcting mixed white balance in Camera Raw.
Pro tip: take one test shot of your buddy at a known depth at the beginning of the dive, and use that as a reference during editing.
Angle and perspective: photograph upwards more often
On dry land, we are used to photographing from eye level or slightly lower. Underwater, this often results in dull images where the subject blends into the dark or messy bottom. Underwater, the opposite works better:
Photograph light upwards, so your subject stands out against the bright water surface, the blue water, or against a light background.
Use sun rays: by photographing upwards, you can capture sun rays that break through the water surface, creating dynamics and depth.
Composition: do not place your subject in the middle of the frame, but play with diagonals and layers (foreground – middle – background) for depth.
A silhouette of a diver or fish against the sunlight is often more dramatic than a perfectly exposed photo from the side.
Keeping your underwater camera alive: care for housing and skin
Water, and specifically salt water, is a silent killer for electronics. Salt crystals and pressure are also the natural enemies of your gear. A few strict rituals make the difference between years of enjoyment and one expensive mistake.
O-rings: small rubber rings, great importance
The only barrier between your thousand-euro camera and ocean water is often a thin rubber ring that seals the unit: the O-ring. This is the most critical part of your set.
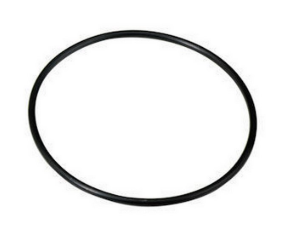
The only barrier between your camera and the ocean. Keep this O-ring squeaky clean, as one hair can break the seal.
Inspection: remove the O-ring before each dive (with a blunt tool, never a knife) and check for sand grains, hairs, or cracks. One hair can already cause leakage.
Greasing: use only the recommended silicone grease and apply very thinly. The grease is not there to seal, but to keep the rubber supple so that it seals itself under pressure. Too much grease attracts dirt.
Closing: close your housing in a dry, dust-free environment (e.g., your hotel room), not on a windy beach.
If you doubt a seal? Don't dive. A missed dive is cheaper than a drowned body.
Anyone who wants to review this as a checklist from a housing manufacturer can refer to Nauticam's own 'Product Care and Maintenance Tips, with practical O-ring instructions and maintenance tips.
Aftercare: rinsing, soaking, drying
Saltwater dries into sharp salt crystals. These act like sandpaper and can eat through your O-rings or jam buttons. Prevention is truly better than cure here.
After each dive day:
Rinse your underwater camera and housing thoroughly in fresh water (preferably still on the boat)
Let housing and camera soak in a basin so that salt can be drawn out of buttons and hinges.
Move all buttons while the set is in the water so that the fresh water can also rinse the salt from the springs of the buttons.
Let everything dry out of direct sunlight, with the O-ring compartments closed until you are in a clean space.
Only after the set has been rinsed and completely dried can the lens go back in the bag. Moisture in your camera bag is fatal for coatings and electronics.
Know depth limits
Every underwater camera and housing has a maximum depth specification (for example, 10m for a compact, 40m for a standard housing, 60m+ for pro housings). Keep this in mind:
Never consciously go beyond that limit, not even "a meter extra for that one photo." The pressure increases by 1 bar every 10 meters.
Dynamic pressure: consider extra pressure from waves or if you jump into the water with the camera.
Check after impact: Did you bump the camera? Check the housing extra carefully before you go deep again; a tiny crack can be fatal under pressure.
Think of your housing as a dive computer: if you ignore the limit, you are playing with expensive consequences.
Conclusion: grow as a photographer beneath the water's surface
Underwater photography forces you to learn to see again. You must understand light in an environment where it is constantly refracted and filtered, you must dare to get closer than you are used to, and you learn to compose in three dimensions.
Underwater photography forces you to learn to see and work again. You must learn to understand light in an environment where it is constantly refracted and filtered, absorbed and reflected. You must dare to get closer than you are used to and create compositions in a three-dimensional space.
Those skills you take back to the surface:
You become more careful with viewpoints: because you move in 3D underwater, you also learn to actively look for angles on dry land.
You develop a sense of light: you learn to recognize contrast and color under difficult conditions.
You learn to think ahead: instead of "spray and pray," you must anticipate the moment.
The challenge: start small with your underwater camera
Grab an underwater camera – it can be a robust compact, action cam, or housing – and start in a controlled environment: a swimming pool, a calm lake, a snorkeling spot close to home. Practice getting close, with white balance, and with different angles.
Do you want to practice in a low-threshold way (pool/snorkeling spot) before you start working with housings and light sets? Then these tips for beginners in underwater photography are a great start.
Once you have that one image where a fish, a child, or a diver floats in a beam of light as if gravity has been temporarily turned off, you will know why it is worth diving literally and figuratively into the deep.